Component, the basic unit of San, is an independent unit of data, logic, and view. From a page perspective, a component is an extension of an HTML element; from a functional mode perspective, a component is a ViewModel.
Component defining
The most basic way to define a component is to inherit from san.Component. San also provides the san.inherits method for inheritance.
1 | function MyApp(options) { |
Then you can use this component by creating an instance with ‘new’ method. Obviously, if you want the component to appear on the page, you need to call the attach method to render the component inside root DOM.
1 | var myApp = new MyApp(); |
The advantage of defining components in an inherited way is that when you use ESNext, you can naturally use extends.
tips: Since ESNext itself does not support overwriting prototype, San supports the static property. You should define template/filters/components properties as static property when use extends a component in ESNext.
1 | import {Component} from 'san'; |
When defining a component in non-ESNext way, it is boring to create a function, call san.inherits and define various prototypes. San provides a shortcut method san.defineComponent to make it easy.
1 | var MyApp = san.defineComponent({ |
Lifecycle
San components use HTML-based template syntax in order too keep their lifecycles consistent with WebComponents.
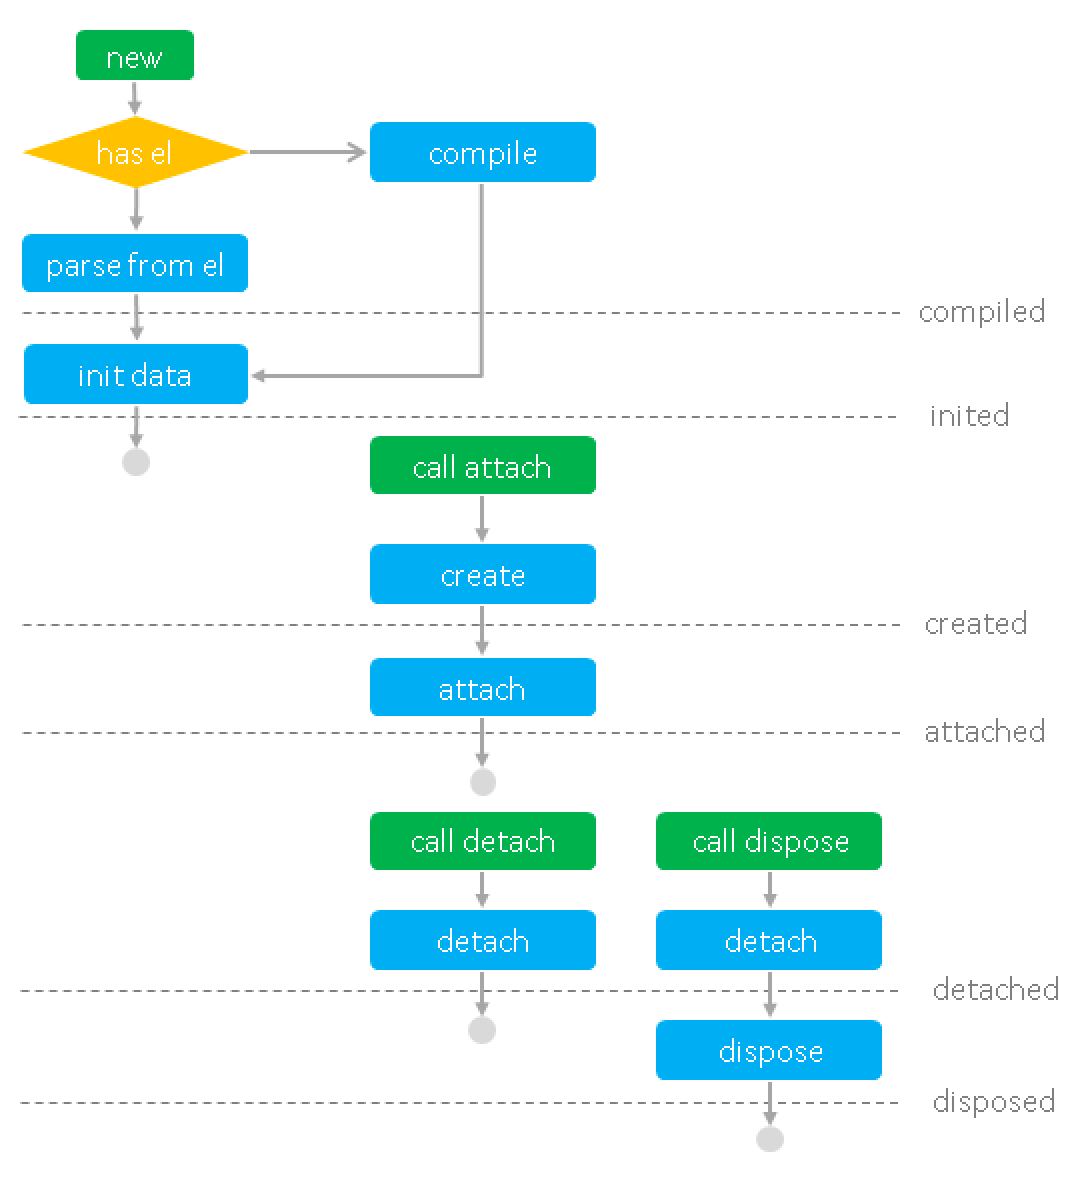
compiled- Compiled the template of a componentinited- Initialized a component instance with template and datacreated- Created a component elementattached- Attached a component to DOMdetached- Detached a component from DOMdisposed- Destoryed a component instance
The lifecycle of a component has some of these features.
- The lifecycle represents the state of the component. The essence of the lifecycle is state management.
- At the different stages of the life cycle, the component will trigger the corresponding hook functions.
- States coexist such as
attachedandcreated. - States are mutually exclusive such as
attachedanddetached,disposedand others. - Some time points do not represent the state of the component, only a certain behavior. The hook function is also triggered when the behavior is completed. For example, updated represents the completion of the view change caused by each data change.
Through the hook function of the life cycle, we can customize to do something in different lifecycles. For example, in the attached lifecycle initiate a request to get data, and then update the data to refresh the view.
1 | var ListComponent = san.defineComponent({ |
The following diagram details the lifecycle of the component
View
Component Template
When defining a component, you can assign a component’s view template through the template.
1 | san.defineComponent({ |
Usually, it’s not friendly to write HTML snippets in JavaScript. We can write templates in separate files and manage them through tools or loaders.
Referencing a template by webpack + ESNext:
1 | TODO |
Referencing a template via the text plugin in an AMD environment
1 | san.defineComponent({ |
attention. It is a rule of San template that is for a component to return one HTML element. You should group a list of children with adding root element.
1 | <dl> |
The HTML element corresponding to the component may be specified by its owner component through the view template, and the view template does not directly declare the corresponding HTML element. You can now specify the HTML element of the view template as template.
1 | <template class="ui-timepicker">{{ value | valueText }}</template> |
slot
The position of a slot can be declared in the view template by slot, the content of which can be defined by the outer component. Refer to the slot document for more details.
1 | var Panel = san.defineComponent({ |
el
The properties of the component instance el represents the HTML element of the component, which can be passed in via option when the component is initialized.
Most of the time you don’t need to care about it when writing components. But if you pass el when you initialize the component, it means that the component has this element as the component root element. And the element will:
- not render the view using the default template
- not create a root element
- directly call compiled, created, attached lifecycle
Sometimes we want the initial view to be direct HTML for the first time, not by the component rendering. But at the same time, we want components to manage data, logic, and views for us, as well as subsequent user interactions and view transformations through component management. In this case, you can pass in an existing element via el.
The component will take the element passed in by el as the component root element and parse out the view structure. This process is called component reversal. Refer to the component reversal document for more.
Data
All component data related operations are provided by the data property of the component instance.
Retrieving Data
Retrieve data through the data.get method.
1 | san.defineComponent({ |
The data.get method accepts a string representing the property accessor, so the above example can also be written like this:
1 | san.defineComponent({ |
Manipulating Data
data provides some methods of data manipulation. Refer to the data method document for more.
Initializing Data
When the component is instantiated, you can pass the data option to specify the component’s initial data.
1 | var MyApp = san.defineComponent({ |
Passing in the initial data when new a component is not a common parttern. In general, If you want to set initial data for each instance when you define a component, you can specify it in the initData method. The initData method returns initial data for the component instance.
1 | var MyApp = san.defineComponent({ |
Computed Data
Sometimes, the value of a data item may be computed from other data items, and we can define computed to compute data. computed is an object, the key is the name of the computed data item, and value is a function that returns the value of the data item.
1 | san.defineComponent({ |
In this case, item name is a computed data, whose value computed from firstName and lastName data item.
tips: In functions of computing data, you can only use the this.data.get method to get the values of data items. You cannot call a component method with this.method or set the component data with this.data.set.
1 | san.defineComponent({ |
The computed data item can depend on another computed data item. In the above example, the name item that the info item depends on is a computed data item. However, be careful when using it, do not form a circular dependency between the computed data items.
Filter
Interpolation is a common way of presenting data when defining view templates. When writing interpolation, we often use filter to convert the data into a form suitable for view presentation.
1 | {{createTime | dateFormat('yyyy-MM-dd')}} |
Built-in filter
San has several filters built in for common scenarios
html- Escaping HTML. This filter is used by default when no filter is specified.url- Escaping URLraw- No escaping. Use this filter when you don’t want to use HTML escaping
Customized filter
By defining the component’s filters member, you can specify which filters the component’s view template can use.
1 | san.defineComponent({ |
The first parameter of the filter function is the data value corresponding to the expression. The parameters passed in the filter call are followed by the second parameter.
tips: Given the independence of components, San does not provide a way to register global filters. Defining the filters used by components must be in their own filters.
Component Level
We know that under the component system, components must be nestable tree relationships. Let’s do some explanation from a piece of code below. In the code below, AddForm internally uses two custom components: ui-calendar and ui-timepicker.
1 | <!-- Template --> |
1 | var AddForm = san.defineComponent({ |
components
Components typically use other components by declaring custom elements.
Which subcomponent types can be used by the component view, which must first be specified by the component’s components member. In components object, the key is the name of a custom element, and the value is component class.
tips:Given the independence of components, San does not provide a way to register global components. Components must declare which components they use internally in their own components.
Some components may use themselves in content, such as tree nodes. We can set the value of this item in components to a string self
1 | var Node = san.defineComponent({ |
owner and parent
The concept of owner and parent has been clarified by react, but it is still specific here.
owner of a component is whoever creates the one and manages its lifetime, interactive communication, etc. owner must be a component. owner of ui-calendar is component AddForm.
parent of a component is whoever would be the containing ancestor of the DOM hierarchy in view. parent of ui-calendar is the outer div。parent has no direct meaning to component management.
ref
When declaring a subcomponent with a name specified by s-ref, you can call it from the ref method of the owner component instance.
tips: With declarative initialization, data binding, and event binding, we rarely need to get an instance of a subcomponent in the owner component. Although San provides this approach, when you use it, please think about whether you want to do this.
message
With the dispatch method, components can dispatch messages to the upper layers of the component tree.
1 | var SelectItem = san.defineComponent({ |
The message will be passed up the component tree until it encounters the first component that processes the message. We can declare messages to be processed by the component in messages. messages is an object, the key is a message’s name, and the value is a function of message handler that receives a parameter object containing the target (the component that dispatches the message) and the value (the value of the message).
1 | var Select = san.defineComponent({ |
Messages are primarily used for components to communicate with upper-level components of non-owner. For example, the owner of the component SelectItem in the slot is the upper-level component. And it needs to communicate with Select.
1 | san.defineComponent({ |
Dynamic Subcomponents
3.10.0 and latter versions support s-is directive to dynamically determine the class of subcomponents.
- The value of
s-isdirective can be an expression, and its evaluated value SHOULD be a string. - The component class to be used is the one defined in
componentswith a key equal to the value ofs-isexpression.
1 | var BLabel = san.defineComponent({ |
Manually Created Subcomponents
In some scenarios, we want components to not create subcomponents when their own views are rendered, but rather to have the flexibility to create subcomponents at some point in the future. For example
- It is inconvenient using declarative way while parent of floating layer(subcomponent) is not in its root element el.
- The list needs to be created and displayed only when the user clicks
Be careful to create subcomponents manually. Here are some tips to note, and the following code fragment also gives some clarification.
- Manually created subcomponents don’t have to be declared in
components - Avoid recreation. A simple approach is to keep a reference to the created subcomponents instance and check if it’s already exists before creating.
1 | san.defineComponent({ |
In 3.7.0 and latter versions, manually created subcomponents supports owner and source options.
Specify owner to wire the subcomponent with its owner:
- The owner can receive messages dispatched from the subcomponent.
- The subcomponent will be automatically disposed when its owner is disposed.
Note:
If owner is specified, do NOT manually push the subcomponent into its owner’s children. Or the subcomponent can be disposed multiple times.
Specify source to bind the manually created subcomponent to its owner:
- data binding (including 2-way data binding)
- events
1 | // Binding data and events of a manually created subcomponent to its owner via `owner` and `source` options. |
1 | // 2-way data binding of a manually created subcomponent to its owner via `owner` and `source` options. |
1 | // Dispatch events from a manually created subcomponent to its owner via the `owner` option. |
Note: In cases where the manually created subcomponent with source option specified is expected to be created multiple times, the source template can be compiled manually to avoid San compiling it each time the subcomponent is created, as a measure of performance improvement.
1 | // Compiling source manually |
In 3.7.1 and latter versions, the source template allows child elements to specify slot contents to be inserted into the manually created subcomponent.
1 | // Specifying slot contents |
Asynchronous Components
Version:>= 3.7.0
createComponentLoader function returns a component loader. When a component loader is specified in components, the component will be loaded asynchronously: the target component will not be rendered during attaching, instead it’ll be rendered after. The features of asynchronous components include:
- Each loader returned by createComponentLoader will be loaded only once. In other words, the
loadmethod will be called only once. - The target component is ensured to be rendered asynchronously. Even if the loading has already completed, the target component rendering will still be queued as a macro task after the current component finished rendering.
createComponentLoader accepts an asynchronous function as its argument, in which case the returned Promise should be resolved as a component class.
1 | var InputComponent = san.defineComponent({ |
Typically, asynchronous components all have a certain complexity. We can specify a placeholder to be shown while the component is loading. In this case, pass an object with a load property specifying the loader function and a placeholder property specifying the placeholder component to the createComponentLoader function.
1 | var InputComponent = san.defineComponent({ |
And a fallback component can be specified in case of load failure. Remember to reject the Promise if it fails.
1 | var LabelComponent = san.defineComponent({ |
The fallback component can also be specified dynamically by the loader. Simply reject the Promise with a component class.
1 | var LabelComponent = san.defineComponent({ |
Error Capture
Version:>= 3.10.7
The error hook called when an error from any descendent component is captured. The hook receives three arguments: the error, the component instance that triggered the error, and a string containing information on where the error was captured.
1 | var Child = san.defineComponent({ |
The error informance info includes:
hook:{{ hookName }}: Captured in lifecycle hooks.initData: Captured in initData function.computed:{{ computedName }}: Captured in computed functions.watch:{{ watchName }}: Captured in data watch handlers.message:{{ messageName }}: Captured in message handlers.filter:{{ filterName }}: Captured in filers.event:{{ eventName }}: Captured in event handlers.transitionCreate: Captured in Animation Controller Creator.transitionEnter: Captured in Enter Animation Controller.transitionLeave: Captured in Leave Animation Controller.